Old advice for setting a Raspberry Pi IP address to a static IP on the Pi itself said to edit the /etc/dhcpcd.conf file, and add it there.
But on Raspberry Pi OS 12 and later, dhcpcd is no longer used, everything goes through Network Manager, which is configured via nmcli or nmtui. If you're booting into the Pi OS desktop environment, editing the IP settings there is pretty easy.
But setting a static IP via the command line is a little different.
First, get the interface information—you can get a list of all interfaces with nmcli device status:
$ nmcli device status
DEVICE         TYPE      STATE                   CONNECTION
eth0           ethernet  connected               Wired connection 1
lo             loopback  connected (externally)  lo
wlan0          wifi      disconnected            --
In my case, I want to set an IP on eth0, the built-in Ethernet.
I can get all the current information about that port with nmcli device show eth0, and I can edit the connection using the terminal UI (nmtui):
$ sudo nmtui edit "Wired connection 1"
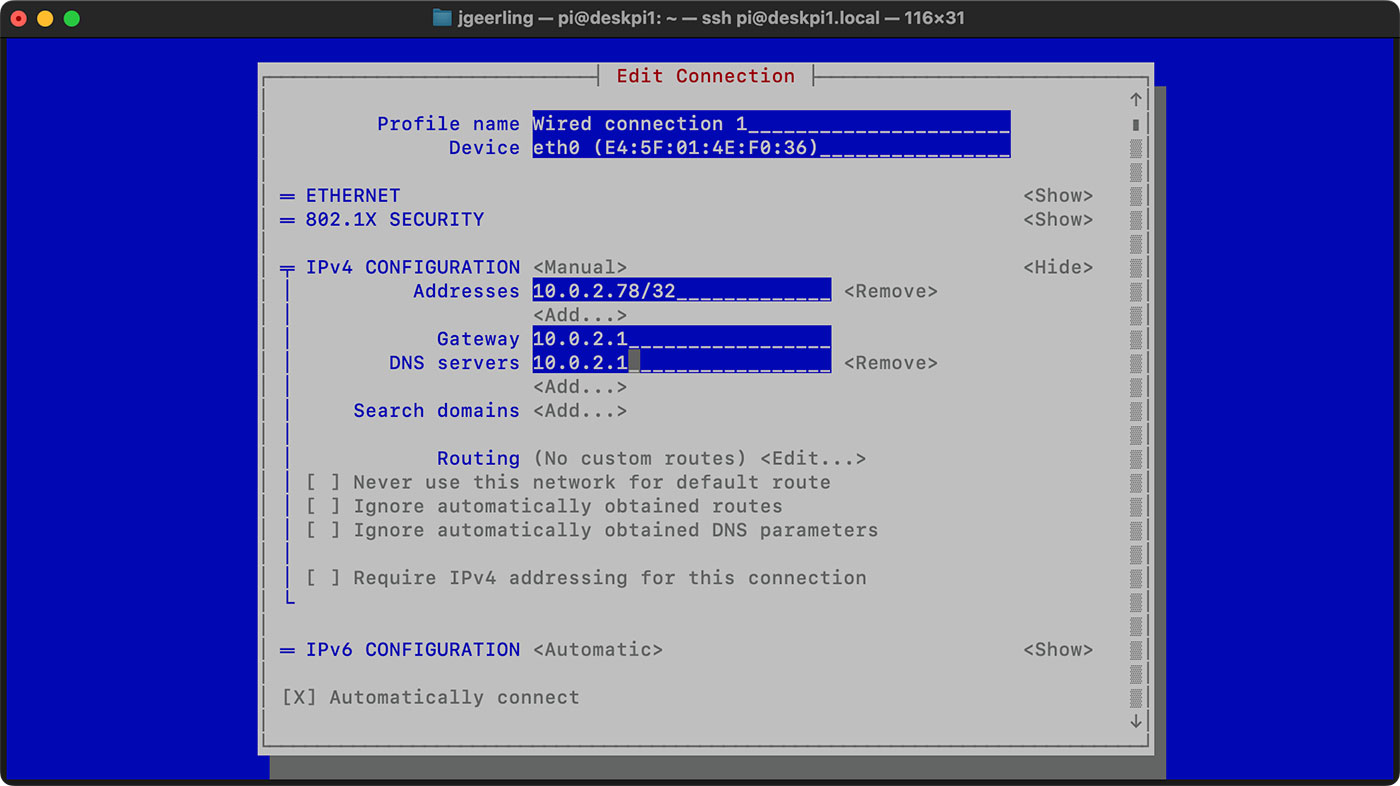
This brings up a connection editor, where you can highlight "IPv4 CONFIGURATION" and change it from <Automatic> to <Manual>, and then use <Show> to show all the settings.
Go through each setting adding in at least an IPv4 address, Gateway, and DNS Server, for example:

Then go down to the bottom and select 'OK'.
This saves the static IP configuration, but doesn't apply it immediately. To apply the changes, you need to restart NetworkManager:
$ sudo systemctl restart NetworkManager
Then if you run nmcli device show eth0, you should see the new IP address (the old one might still be attached to the interface at the same time until you reboot):
pi@deskpi1:~ $ nmcli device show eth0
GENERAL.DEVICE:                         eth0
...
IP4.ADDRESS[1]:                         10.0.2.78/24
IP4.ADDRESS[2]:                         10.0.2.90/24
You can also configure a static IP entirely via nmcli without using the UI; see this article on nmcli` from Cyberciti.biz.
For bonus points, you can easily automate changes to network interfaces with Ansible, for example:
    - name: Configure static IP address (using Network Manager).
      community.general.nmcli:
        conn_name: "Wired connection 1"
        ifname: eth0
        type: ethernet
        ip4: "10.0.2.78/24"
        gw4: "10.0.2.1"
        state: present
      notify: restart networkmanager
Comments
You can also replace the 'restart networkmanager' part with reactivating the specific connection. But of course only if you're logged in locally or via a different connection :)
I tried that too, actually—but it didn't seem to pick up the new IP for some reason, until I restarted all of networkmanager. Might've just been too impatient.
I had the opposite problem with networkmanager, restarting it wouldn't help it drop an IP address I wanted to take away from it!
I am able to force it to drop an IP address with nmcli dev reapply
NetworkManager is the new systemd-like borg only worse. Ugh. Such a step backward from old-school especially with wpa_supplicant being removed.
dhcpcd > networkmanager
what happens if the chosen P address for static IP is already taken? I guess in this tutorial your are choosing the same IP already assigned to the Pi to be static right? Is there a guarantee that address is always available for the Pi? Let's say you disconnect the pi for a month and plug it back into the network. Maybe some other device has gotten this IP already. Then what happens in that case?
After not finding dhcpcd.conf any longer on bookworm, I searched hi-n-low until I came across this article by Jeff.
Thanks my friend! You did it again! Now I know how to configure the Static IP from the command line!
Heh, some people on the Pi Forums seem to think you shouldn't need to configure a static IP anymore, but I beg to differ—many reasons why it's still handy to be able to do.
Indeed. E.g. a tiny telemetry network with no DHCP server. Adding complexity and dependencies just adds more points of failure. I just need the device to bring up an IP interface. Not all devices are on home consumer networks!
Anyway to add subinterface to eth0 , such as eth0.0 eth0.1 and eth0.2, with different ip addresses as well as different mac addresses ?
How can I switch back to dhcpcd? I am still used to implementing static IP settings by editing the /etc/network/interfaces
I'm using my Pi5 as a DHCP/BootP server so it's IP has to be static (chicken or egg?). Used 'nmtui' to configure static IP and, for security reasons, configured sshd to only listen on that IP. Reboot (I'm lazy). Imagine my surprise when PiOS (12 Bookworm) starts the sshd before the NetworkManager! SSHD fails to start because the interface isn't configure/up yet. Guess I've got to go into my closet, hook up a monitor and keyboard to my headless Pi5, login and start sshd. How convenient! Bring back init.d!